
 YouYoung Seo
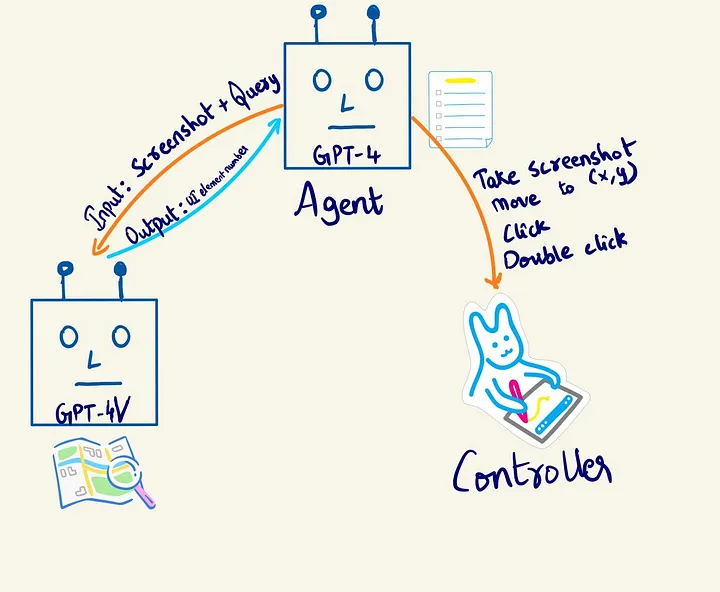
TLDR
By leveraging the GPT-4 Vision API, combined with grounding techniques like pre-annotation and element numbering, and orchestrating actions through a structured agent-based system, it's possible to automate UI control for .NET and SAP desktop applications. This visual approach circumvents the limitations of traditional HTML-based automation, enabling a more versatile solution for complex desktop environments.
Introduction
The rise of Large Language Models (LLMs) like ChatGPT has marked a new era in AI, particularly in text generation. While tools like AutoGPT have aimed to automate tasks, their reliance on DOM/HTML code poses challenges for desktop applications built on .NET or SAP. The GPT-4 Vision (GPT-4v) API provides a solution by focusing on visual inputs, eliminating the need for HTML. This innovative approach enables automated UI control by interpreting what the AI "sees" and translating that understanding into actionable commands.
The Foundation of Stability
While GPT-4v is powerful for image analysis, accurately pinpointing UI elements can be tricky. The "Grounding" technique, which involves pre-annotating images using tools like Segment-Anything (SAM), simplifies object identification for GPT-4v. By labeling elements beforehand, we give the model a solid foundation to work from. This is further enhanced by numbering UI elements.
Streamlining Interaction Through Numbering
For easier interaction, numbering UI elements is crucial. Assigning a number, like "34," to a "Start for Free" button allows GPT-4v to provide instructions that can be directly translated into coordinates for the device controller to act upon. While visual AI is rapidly advancing, its accuracy can still fluctuate without such measures.
Building Resilient Workflows
The goal is simple: input a task and receive a series of actions that accomplish it. To achieve this, the system architecture is composed of three sequential capabilities: goal breakdown, vision (image understanding), and system control.
The Agent-Based Approach
A GPT-4 text model acts as the "Orchestrator," interfacing with both GPT-4v and a device controller. This architecture allows for a clear separation of concerns, leading to a more modular and maintainable system.
Core Components Explained
GPT-4V: The Visual Interpreter
GPT-4v analyzes UI screenshots to identify interactive elements. A visionary_function is implemented to request this UI element identification. The function takes a screenshot path as input and returns the identified interactive elements for automation.
Device Controller: The Action Executor
The DeviceController class is central, executing UI actions based on GPT-4v's guidance. Its functions include:
move_mouse(x, y): Moves the cursor and performs clicks.double_click_at_location(x, y): Executes double clicks at specified locations.enter_text_at_location(x, y, text): Inputs text at a given location.take_screenshot(): Captures and annotates the current UI state.
This class serves as a low-level interface for operating system interaction, translating high-level instructions from the Orchestrator into concrete actions.
Orchestrator: The Strategic Planner
The Orchestrator, powered by a GPT-4 text model, plans and executes tasks by leveraging the DeviceController and GPT-4v. It comprises the Planner (goal breakdown and action strategy), UserProxyAgent (communication facilitator), and Controller (UI action execution). The Orchestrator follows a structured workflow: initialization, planning, execution, and verification. Microsoft's AutoGen library is employed to enable communication between GPTs, allowing them to coordinate their actions.
Putting it All Together
A sample task, like clicking the GitHub icon and navigating to the 'blogs' repository, demonstrates the system's workflow. The Orchestrator receives the task, plans the steps, the Controller executes them, and the Orchestrator verifies the results. A log history provides details of the executed functions, showcasing the system's operational dynamics.
Conclusion
By combining the GPT-4 Vision API with grounding techniques, a robust device controller, and a strategic orchestrator, the presented system achieves automated UI control for .NET/.SAP desktop applications. This approach overcomes the limitations of HTML-based methods, offering a more versatile and visually-driven solution. The integration of tools like AutoGen further enhances the system's capabilities, paving the way for significant advancements in automation.
FAQ
How does the system handle dynamic UI elements that change position or appearance?
The system relies on taking frequent screenshots and re-analyzing the UI with GPT-4V. Grounding techniques, such as numbering elements, also help the system adapt to changes, as the numbers provide a stable reference point even if the visual appearance shifts.
What is the advantage of using GPT-4 Vision API over traditional UI automation tools?
Traditional UI automation tools often depend on accessing the DOM or underlying code structure of the application, which is not always possible with .NET or SAP desktop applications. GPT-4 Vision API works by "seeing" the UI like a user would, allowing it to automate tasks regardless of the underlying technology.
What are the limitations of this approach?
The system's performance is dependent on the accuracy of GPT-4V and the speed of taking and processing screenshots. Complex or rapidly changing UIs might present challenges. Additionally, ensuring the security and privacy of sensitive data displayed in screenshots is crucial.
How can I improve the accuracy of object identification?
Improve the accuracy of object identification by using detailed pre-annotation of the images, optimizing screenshot quality, and carefully crafting prompts for GPT-4V to provide clear instructions. Regularly fine-tuning the grounding techniques can also lead to improvements.
Does the system require training data specific to each application?
While the system can work with minimal training, providing application-specific examples and fine-tuning the prompts and grounding techniques can significantly improve its performance. The more familiar the system is with the specific UI elements and workflows, the more accurate and reliable it will be.